

click on image for full view
ARTWORK: Artist © verymany
Tubes used in this Tut - Guitar_Hero & Brutal_Girl
In order to use the images in this tutorial you MUST purchase them from Pics For Design HERE
Supplies needed
Emo Hottie Cluster Frame freebie from Kristin/Toxic Desirez HERE
MASK: Vix_Mask 151 and Vix_Mask 143 HERE
FONT: 2Peas Barefoot Professor
Plugins used: Eye Candy 4000 - Gradient Glow
Xero - Porcelain
Dropshadow (Used thru out Tut) - V&H-5, Opacity-61, Blur-5 Black
I used 3 colors from the frame...
Foreground - #fb26bc Background - #46bad3, #5b489b
Okay lets have some fun!!!
Open Kristin's Emo Hottie Cluster Frame
Duplicate and close...add dropshadow
New raster layer...move it below frame and floodfill with #5b489b
Apply your mask 151 with source luminance, fit to canvas, and hide all mask ticked
Merge group and add dropshadow
New raster layer...floodfill with #fb26bc
Apply your mask 151 again same as above ticked
Merge group and add dropshadow
New raster layer...floodfill with #5b489b
Apply your mask 143 with same as above ticked
New raster layer...floodfill with #fb26bc
Apply your mask 143 with same as above ticked
Image>Flip
Merge group (this will merge both mask layers onto one layer)
Add dropshadow
Open your tubes and duplicate then close originals
Minimize the one you are placing in the frame...
Copy and paste as a new layer the main tube you will be using
Resize to fit your tag and place it to the right...
If you are using the same tube that I did...you will resize it by 80% ... 3 times...
then you will have to copy and paste the collar, piercing, hose, and tattoo...resizing each by 80% 3 times as well.
merge down til all of your tube layers are on one layer...
add dropshadow
Activate your MagicWand with these settings
Mode - Replace...RGB Value...Tolerance & Feather 0...
Contiguous checked...AntiAlias checked Inside checked

Click inside Frame where tube goes...
Selection > Modify > Expand by 8
Maximize your other tube
Activate your MagicWand with these settings
Mode - Replace...RGB Value...Tolerance & Feather 0...
Contiguous checked...AntiAlias checked Inside checked
Click inside Frame where tube goes...
Selection > Modify > Expand by 8
Maximize your other tube
Resize by 90%...Image > Mirror
Copy and paste as a new layer
Selection > Invert > hit Delete on keyboard > Deselect
Copy and paste as a new layer
Selection > Invert > hit Delete on keyboard > Deselect
Effect > Xero > Porcelain with the following settings
change the opacity to 89

I resized my tag by 80% here...
Add your name with #fb26bc as your foreground and #46bad3 as your background
Convert to raster layer
add dropshadow
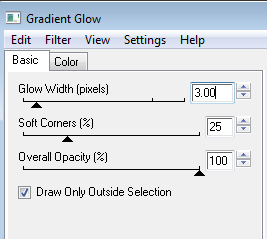
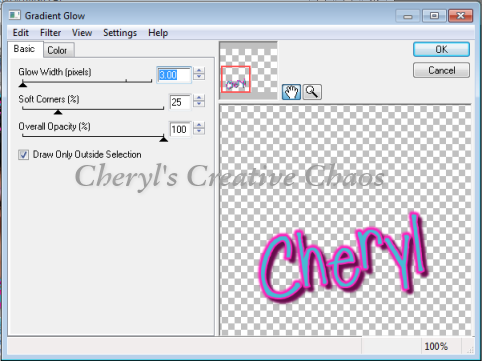
Effect > EyeCandy4000 > Gradient Glow with the following settings
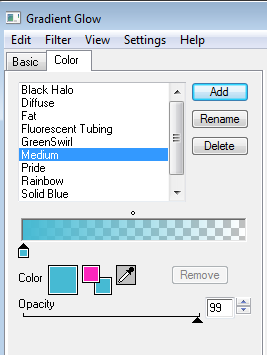
click on color tab and change the color to the pink (#fb26bc) and apply
then do it again this time applying the purple (#5b489b)
then do it again and this time apply the blue (#46bad3)
Add appropriate copyright
merge visible and save as a PNG ... and you are done!
I hope that you enjoy my tutorial ... and that you will give me a shoutout to let me know that you stopped by and if you are going to try it...
Thank you so much for this tutorial! Can't wait to try it out!
ReplyDeleteCame by to try your tut! Good job! Hugs!
ReplyDelete